Your own AI research assistant, running on your computer, powered by your API keys.
K-Dense BYOK (Bring Your Own Keys) is an open-source app that lets you chat with an AI assistant called Kady. You ask Kady a question or give it a task, and it figures out the best way to handle it — sometimes answering directly, sometimes spinning up specialized AI "experts" that work behind the scenes to get you a thorough result.
It's built for scientists, analysts, and curious people who want a powerful AI workspace without being locked into a single provider. K-Dense BYOK is powered by our very popular Claude Scientific Skills.
Beta: K-Dense BYOK is currently in beta. Many features and performance improvements are on the way in the coming weeks. Star us on GitHub to stay in the loop, and follow us on X, LinkedIn, and YouTube for release notes and tutorial videos.
- Answer questions and complete tasks — Ask Kady anything. For complex work, it delegates to AI experts that each have their own specialties (bioinformatics, finance, data analysis, etc.) with full access to our 170+ scientific skills.
- Search the web — Kady can look things up online and pull in live information while working on your request.
- Work with your files — Upload files, create new ones, and preview them right in the app. Everything stays in a local sandbox folder on your machine. Can handle almost any file type.
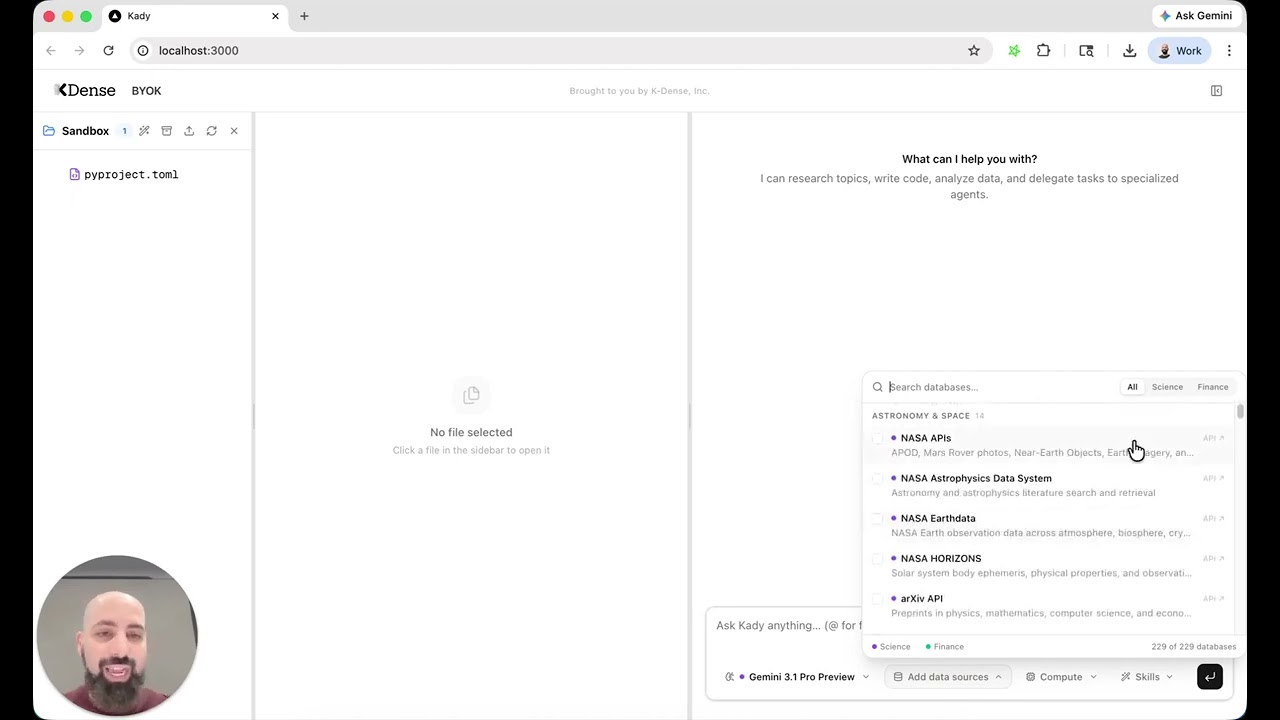
- Access 250+ scientific databases and 500k+ Python packages — Kady's experts come pre-loaded with specialized scientific skills from K-Dense, covering everything from genomics to materials science.
- Choose your AI model — Pick from 40+ models (OpenAI, Anthropic, Google, xAI, Qwen, and more) through a simple dropdown in the app. You're not stuck with one.
- 326 ready-to-use workflows — Browse a built-in library of workflow templates spanning 22 disciplines — from genomics and drug discovery to finance and astrophysics. Pick a workflow, fill in the variables, select a model, and launch. Each workflow comes with curated skill suggestions so the agent knows exactly which tools to reach for. Workflows that need uploaded data are clearly marked, and you can upload files directly from the launch dialog.
- Run heavy computations remotely — Optionally connect Modal to run demanding workloads on powerful cloud hardware instead of your laptop.
- Add custom MCP servers — Extend the AI experts' capabilities by adding your own MCP servers through the Settings panel. Custom servers are merged with the built-in defaults and persist across app restarts.
Note: The model you select in the dropdown only applies to Kady (the main agent). Expert execution and coding tasks use the Gemini CLI, which always runs through a Gemini model on OpenRouter regardless of your dropdown selection.
| What | Why | Where to get it |
|---|---|---|
| A computer running macOS or Linux | The app runs locally on your machine | Windows works too — just use WSL |
| An OpenRouter API key | This is how the AI models are accessed | openrouter.ai — sign up and create a key |
| A Parallel API key (optional) | Lets Kady search the web | parallel.ai |
| Modal credentials (optional) | Only needed if you want remote compute for heavy jobs | modal.com |
That's it. The startup script handles installing everything else automatically.
Open a terminal and run:
git clone https://github.com/K-Dense-AI/k-dense-byok.git
cd k-dense-byokInside the kady_agent folder you'll find a file called env.example. Make a copy of it and rename the copy to .env (note the dot at the start). Then open .env in any text editor and paste your OpenRouter API key on the first line — that's the only key you need to get started.
The file also has sections for other keys you can optionally fill in: Parallel for web search, Modal for remote compute, and a long list of scientific database and government data API keys. Just leave blank anything you don't need.
chmod +x start.sh
./start.sh
The first time you run this, it will automatically install any missing tools (Python packages, Node.js, Gemini CLI) and download scientific skills. This may take a few minutes. After that, future starts will be much faster.
Once everything is running, your browser will open to http://localhost:3000 — that's the app.
To stop everything, press Ctrl+C in the terminal.
The app runs three services on your computer:
| Service | What it does |
|---|---|
| Frontend (port 3000) | The web interface you interact with — chat, file browser, and file preview side by side |
| Backend (port 8000) | The brain — runs Kady and coordinates expert tasks |
| LiteLLM proxy (port 4000) | A translator that routes your AI requests to whichever model you've chosen via OpenRouter |
When you send a message, Kady reads it, decides whether to answer directly or delegate to an expert, uses any needed tools (web search, file operations, scientific databases), and streams the response back to you.
k-dense-byok/
├── start.sh              ← The one script that starts everything
├── server.py             ← Backend server
├── kady_agent/           ← Kady's brain: instructions, tools, and config
│   ├── env.example       ← Template for your API keys (copy to .env)
│   ├── .env              ← Your API keys (created from env.example)
│   ├── agent.py          ← Main agent definition
│   └── tools/            ← Tools Kady can use (web search, delegation, etc.)
├── web/                  ← Frontend (the UI you see in your browser)
├── sandbox/              ← Workspace for files and expert tasks (created on first run)
└── user_config/          ← Your persistent settings (custom MCP servers, etc.)
You can extend the tools available to Kady's expert agents by adding your own MCP servers. Click the gear icon in the top-right corner of the app, then open the MCP Servers tab.
The editor accepts a JSON object where each key is a server name and its value is the server configuration. For example:
{
  "my-server": {
    "command": "npx",
    "args": ["-y", "my-mcp-server"]
  },
  "remote-api": {
    "httpUrl": "https://mcp.example.com/api",
    "headers": { "Authorization": "Bearer your-token" }
  }
}
Your custom servers are merged with the built-in defaults (docling, parallel-search) and passed to the Gemini CLI. The custom configuration is saved in user_config/custom_mcps.json at the project root — outside the sandbox/ directory — so it survives sandbox deletion and app restarts.
BYOK stands for Bring Your Own Keys. Instead of paying a subscription to a single AI company, you plug in API keys from whatever providers you prefer. You stay in control of which models you use, how much you spend, and where your data goes.
The workflow library lives in a single JSON file at web/src/data/workflows.json. Adding or improving a workflow is one of the easiest ways to contribute to the project.
Each workflow is a JSON object with these fields:
{
  "id": "unique-kebab-case-id",
  "name": "Human-Readable Name",
  "description": "One-sentence summary shown on the card",
  "category": "genomics",
  "icon": "Dna",
  "prompt": "Detailed instructions with {placeholder} syntax for user variables",
  "suggestedSkills": ["scanpy", "scientific-visualization"],
  "placeholders": [
    { "key": "placeholder", "label": "What to ask the user", "required": true }
  ],
  "requiresFiles": true
}
Set requiresFiles to true when the workflow needs user-uploaded data (datasets, manuscripts, images, etc.). These workflows display a "Files" badge on the card and show an upload button in the launch dialog so users can add files to the sandbox before running.
- Open
web/src/data/workflows.json. - Add your workflow object anywhere in the array (it will be grouped by
categoryautomatically). - Pick a
categoryfrom the existing 22 disciplines (paper,visual,data,literature,grants,scicomm,genomics,proteomics,cellbio,chemistry,drugdiscovery,physics,materials,clinical,neuro,ecology,finance,social,math,ml,engineering,astro) or propose a new one. - Choose an
iconname from Lucide Icons (PascalCase, no "Icon" suffix — e.g.FlaskConical,Brain,Dna). If the icon isn't already imported inworkflows-panel.tsx, add it there too. - List
suggestedSkillsfrom the K-Dense scientific skills — these are passed to the agent so it knows which tools to load. Only use skill IDs that exist in the repo. - Use
{placeholder}syntax in the prompt for any variable the user should fill in, and add a matching entry inplaceholders.
- Write prompts with numbered steps so the agent follows a clear procedure.
- Include 2–5
suggestedSkills— enough to be helpful, not so many that they dilute focus. - Mark placeholders as
"required": trueonly when the workflow genuinely can't run without them. - Keep descriptions under ~120 characters so they display well on the card.
Submit your addition as a pull request. We review and merge workflow contributions quickly.
The expert delegation system relies on the Gemini CLI, which uses Gemini models to execute tasks with our scientific skills. While this works well for many workflows, there are some rough edges to be aware of:
- Skill activation is not always reliable. Gemini models sometimes skip a relevant skill, use it partially, or misinterpret the skill's instructions. This is especially noticeable with complex multi-step skills that require strict adherence to a procedure.
- Tool-calling consistency varies. The Gemini CLI occasionally drops tool calls mid-execution or calls tools with incorrect arguments, which can cause expert tasks to stall or produce incomplete results.
- Long-context degradation. When a skill injects a large amount of context (detailed protocols, multiple reference databases), Gemini models may lose track of earlier instructions or produce less focused output.
- Structured output can drift. For skills that require specific output formats (tables, JSON, citations), Gemini models sometimes deviate from the requested structure.
These are upstream limitations of the Gemini model family and the Gemini CLI tooling, not bugs in K-Dense BYOK itself. Google is actively improving both, and we see meaningful progress with every new model release and CLI update. As these improve, the expert delegation experience will get better automatically without any changes on your end.
If you hit a case where a skill isn't behaving as expected, try re-running the task since results can vary between runs. You can also switch Kady's main model (via the dropdown) to a non-Gemini model for the orchestration layer while experts continue to use Gemini under the hood.
- Ollama local model support
- Better utilization of Skills
- Choose what model to use with Gemini CLI
- Choice between Claude Code or Gemini CLI as the delegation expert
Support of MCP config in the UI— Done! Open Settings > MCP Servers to add custom servers.- Better UI experience tailored to scientific workflows
- Faster PDF parsing
- AutoResearch integration
- And much more
K-Dense BYOK is great for getting started, but if you want end-to-end research workflows with managed infrastructure, team collaboration, and no setup required, check out K-Dense Web — our full platform built for professional and academic research teams.
If you run into a problem or have an idea for something new, please open a GitHub issue. We read every one.
K-Dense BYOK is open source because K-Dense believes in giving back to the community that makes this kind of work possible.